Color Detection Robot

To pursue a highly rewarding career, seeking for a job in challenging and healthy work environment where I can utilize my skills and knowledge efficiently for organizational growth. Seeking a beginners role to explore and enhance my technical knowledge gained at University in the last few years. I am looking for a responsible job with an opportunity for professional challenges and self development that enables me as a fresh graduate to grow while fulfilling organizational goals
In this blog, I will show you how to build a color detection robot with RGB color sensor tcs230 and an Arduino microcontroller.
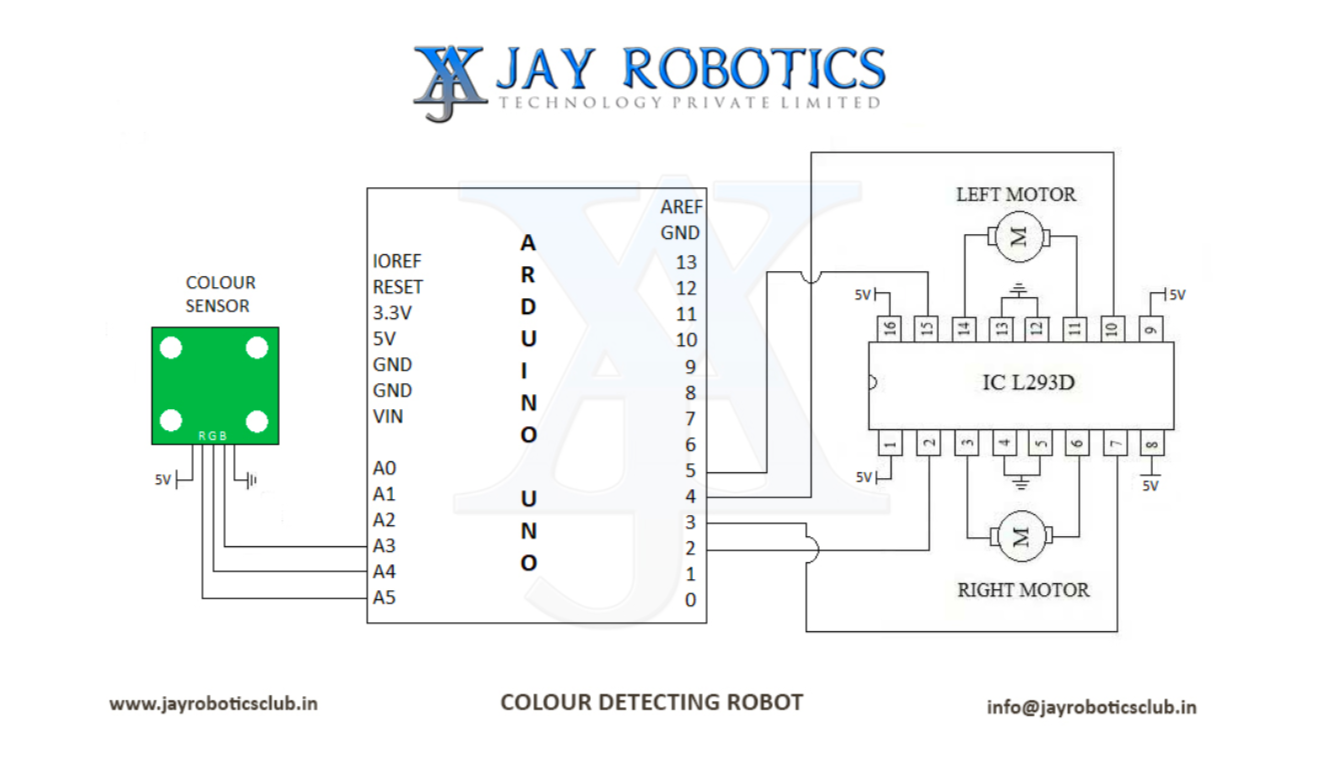 image credits : JAY Robotics
Components required
- Arduino UNO
- RGB Color Sensor
- Gear Motors
- IC L293D
Arduino UNO
Arduino is an opensource electronics platform based on easy-to-use hardware and software. Arduino boards are able to read inputs - light on a sensor , a finger on a button , or a twitter message - and turn it into an output - activating a motor , turning on a LED , publishing something online. To do so use the Arduino programming language (based on wiring) and the Arduino Software (IDE) based on processing.
RGB Color Sensor
A photodiode is used by colour sensors to collect ambient light and detect RGB values. The colour of the reflected light will vary based on the colour of the item when it is exposed to light that has RGB components.
Gear Motors
It is a DC motor with a gear box for decreasing the speed and increasing the torque and power . This type of motors is commonly used for robotic applications.
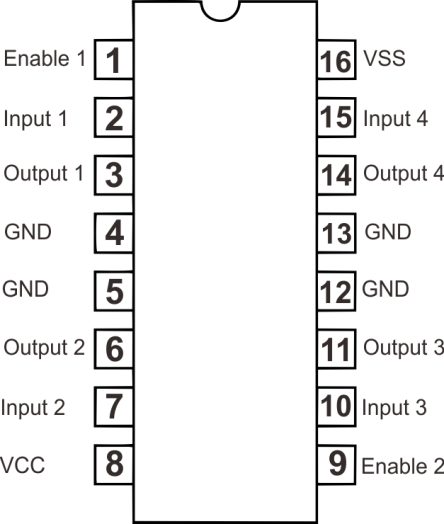
IC L293D
IC L293D is a dual H-bridge motor driver integrated circuit that can drive current of up to 600mA with voltage range of 4.5 to 36 volts.
Code
const int sampling = 100;
unsigned long v, w, x;
void setup() {
  Serial.begin(9600);
  pinMode(2, OUTPUT);
  pinMode(3, OUTPUT);
  pinMode(4, OUTPUT);
  pinMode(5, OUTPUT);
}
void loop() {

  for (int i = 0; i < sampling; i++) {
    int a = analogRead(A5);
    int b = analogRead(A4);
    int c = analogRead(A3);
    v += a ;
    w += b;
    x += c;
  }
  v /= sampling;
  w /= sampling;
  x /= sampling;
  Serial.print("a"); Serial.print(v);
  Serial.print("b"); Serial.print(w);
  Serial.print("c"); Serial.print(x);

  if ((38 < v < 42) && (46 < w < 48) && (59 < x < 61))
  {
    digitalWrite(2, HIGH);
    digitalWrite(3, LOW);
    digitalWrite(4, HIGH);
    digitalWrite(5, LOW);
  }
  if ((38 < v < 42) && (62 < w < 65) && (60 < x < 62))
  {
    digitalWrite(2, LOW);
    digitalWrite(3, LOW);
    digitalWrite(4, LOW);
    digitalWrite(5, LOW);
  }
}